
Custom Search

Friday, January 22, 2010

Business Card


I. Make the measurements of the business card 2 x 3.5 inches.

II. Then the resolution should be at about 92.

III. After this I opened up the logo I wanted to use.

IV. Then I resized the logo using Free Transform.

V. After resizing the logo I centered it on the business card using the Move Tool.

VI. After I had done that I used the Eyedropper Tool to copy the same colored orange on my
logo.

VII. After using the Eyedropper Tool, I used the Paint Bucket Tool to apply the color I copied on the back of my business card.

VIII. Then after everything was in place I first put the address of my business on my business card on the bottom left using the Horizontal Type Tool.

IX. I repeated this same process with my email, phone number, and website address using font size 8 for everything.

X. Then all I had left to do was put a little quote on the top of my business card.

XI. Then you should be done with a completed business card.
Reflection
Creating my first business card wasnt too difficult. I just used my basic knowledge around photoshop to apply the necessary movements i needed to make a great business card. I also managed to put information on the business card such as the address to my business, phone number, email, and the website's address. I'm satisfied with the outcome and the proffesional look of my business card.

Monday, December 14, 2009

http://www.entheosweb.com/photoshop/3d_ball.asp

Have you ever wondered about how to create a 3D Ball in Photoshop. Well I'll tell you about how this 3D Ball helped me out. I needed help to create an artificial 3D Ball for one of my Photoshop assignments. The steps provided in the tutorial were fairly easy so anybody with common knowledge towards Photoshop can do this. This tutorial taught me how to create a 3D Ball using a few brushes and the Elliptical marquee tool. For a few airbrushes all you'll need to do is shade a few spots of the ball in. Then with the Elliptical marquee tool all you'll have to do is hold the shift key down and draw a circle on the canvas. Not only is this tutorial easy, but anybody can manage to finish and create an artificial 3D Ball in just 5 minutes with this 6-step process.

Friday, December 11, 2009

Michael Jordan Collage
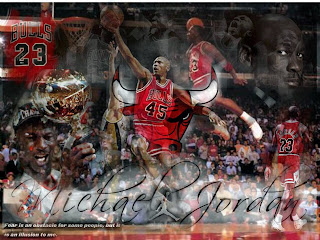


This collage was my first big project in my class. So i decided to try and take it a bit easy by doing something simple so i just thought of Michael Jordan. It probably took my 3-4 hours to complete because it wasnt too difficult it was fairly easy. I mostly used the tool layer mask to hide the pictures and then reveal it to show an image fading.

I. Make the resolution 300.

II. Then make the sheet transparent.

III. After this I went on the internet and looked up pictures of Michael Jordan that I wanted to use on the collage.

IV. First I picked out a background picture and aligned it in the back.

V. Then I created new layers and opened up the pictures that I would want to use.

VI. After you’ve opened up the pictures you click on move tool and move the picture onto the background that you’ve just made.

VII. After you’ve moved it make sure that it’s the right size and you could check by moving it first onto your background and if it doesn’t fit just simply delete that layer and go to image, image size, and simply make the width smaller and the height will follow it so you don’t have to fix the height.

VIII. Then go to layers, layer mask, and hide all to make your layer mask hidden onto your background.

IX. After its hidden you click on your brush tool and then click on the hidden picture to reveal it.

X. If you want to reveal it quicker or slower you just go change the opacity level which is located on top of your picture.

XI. Also, if your picture has white edges and you don’t want them revealed I suggest you go to your magic wand tool and click on the white edges and simply click delete and that should erase the white edges on your picture.

XII. I kept repeating steps 6-9 with all of my pictures to finish my collage.

XIII. Before I completely finished my collage I used to tool brightness and contrast and made their levels a bit higher to make my collage stand out more and look better.

XIV. That’s how I made a great collage.